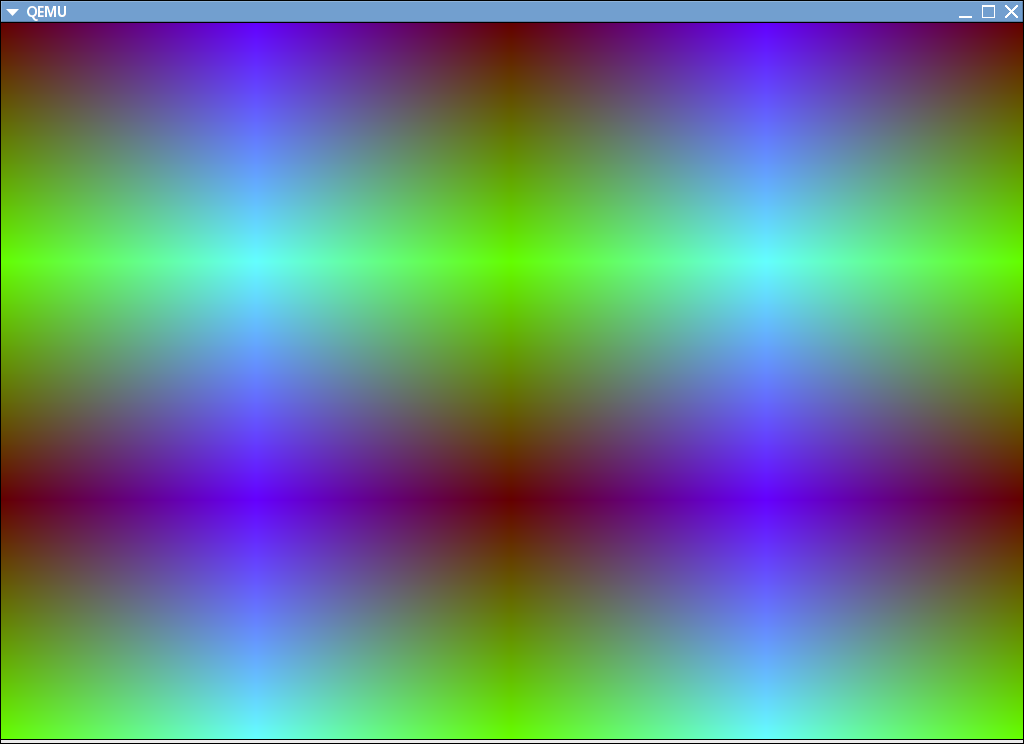
看到红色的Challenge就想挑战一把,于是搞了下VESA图形模式的编程。
科普知识:
什么是VBE?
VBE的全称是VESA BIOS Extension。
什么是VESA?
VESA的全称是Video Electronics Standards Association即视频电子标准协会,是由代表来自世界各地的、享有投票权利的超过165家成员公司的董事会领导的非盈利国际组织。
VESA致力于开发、制订和促进个人计算机(PC)、工作站以及消费类电子产品的视频接口标准,为显示及显示接口业界提供及时、开放的标准,保证其通用性并鼓励创新和市场发展。
其余更多信息,也有设计到本文内容理解方面的,详见文末参考资料。
既然是BIOS的扩展,那么最方便的还是在实模式下操作,但是我们实模式的代码只有很小一部分,写多了会超过引导区512字节限制,而且实模式下操作范围实现有限,所以要想办法处理。
解决方法有两种:
1、参考VESA开发手册提供的操作步骤,可以指导我们在保护模式下进行对其进行BIOS调用,但是步骤比较繁琐。
2、在实模式下开启图形功能后,把显存地址保存下来,然后在保护模式下操作这个地址从而达到对图形界面进行控制的目的,缺点是不能使用VBE内置的功能调用。
为了方便试验我选择了第二种方法,步骤如下:
1、开启A20地址线(LAB1已有代码)
2、加载GDT(已有代码)
3、获取VBE模式(新增代码)
4、设置VBE模式(新增代码)
5、开启保护模式(已有代码)
6、保护模式下的图形处理(新增代码)
注意,由于qemu的默认显卡bois不支持vesa模式,所以要在GNUmakefile中给QEMUOPTS变量添加额外参数 -vga std 即可。
涉及到代码文件boot/boot.S
在步骤2和步骤5所涉及到的代码中间加入如下代码
  sti    #enable interrupt
  call    getvideomode
  call    setvideomode
  cli    #disable int
在16位代码区域末端加入如下代码,这里使用了0x4144模式代表了1024*768*32bpp,每32位一个像素点,一个1024*768个像素,三个数乘起来就是可视显存大小。其中videop videox videoy 分别代表显存起始地址,x分辨率,y分辨率,是在代码文件末尾定义的三个变量,在从boot到kernel跳转的过程中可以把这几个变量值押送过去,或者把这几个变量放到指定位置供保护模式下使用,不过我比较懒没有传递这个值,而是直接写到kernel代码中了:
getvideomode:
        mov getvideomode:
        mov getvideomode:
        mov getvideomode:
        mov $0x4144, %cx #mode 0x4144 1024*768*32bpp
        mov $0x4f01, %ax #get mode
        mov $0x8000, %di #mode info block address
        int $0x10       #VBE int
        ret
setvideomode:
        movw $0x4144, %bx
        movw $0x4f02, %ax #set mode
        movw $0x8000, %di
        int $0x10       #VBE int
        movl 40(%di), %eax #get memory address
        movl %eax, videop
        movw 18(%di), %ax  #get x resolution
        movw %ax, videox
        movw 20(%di), %ax  #get y resolution
        movw %ax, videoy
        ret
在kern/目录下新增video.h文件,内容如下
#ifndef VIDEO_H
#define VIDEO_H
extern const short vx; //x resolution
extern const short vy; //y resolution
extern long* const vp; //display memory point
int setpixel(short x, short y, int c); //draw a pixel
void clear(int c);//clear screen
int fillrect(short x, short y, short l, short w, int c);//fill a rectangle
int drawbeeline(short x, short y, short l, int c);//draw a beeline
int drawline(short fx, short fy, short dx, short dy ,int c); //draw line
#endif
在kern/目录下新增video.c文件,内容如下
#include "video.h"
#include <inc/math.h>
const short vx=1024;
const short vy=768;
long * const vp=(long *)0xD0000000;
const long  vl=1024*768;
int setpixel(short x, short y, int c)
{
        /*if((x>=vx)||(y>=vy))
                return -1;
        */
        *(vp+x+(y*vx)) = c;
        return 0;
}
void clear(int c)
{
        int i;
        for(i=0; i<vl; i++)
                *(vp+i) = c;
}
int drawrect(short x, short y, short l, short w, int c)
{
       /*if((x>=vx)||(y>=vy))
                return -1;
        */
        for(w=y+w; y<w; ++y)
        {
                drawbeeline(x, y, l, c);
        }
        return 0;
}
int drawbeeline(short x, short y, short l, int c)
{
        for(--l; l>=0; --l)
                *(vp+l+x+y*vx) = c;
        return 0;
}
int drawline(short fx, short fy, short dx, short dy ,int c)
{
        float len = sqrtf((dx-fx)*(dx-fx)+(dy-fy)*(dy-fy));
        float sin = (dx-fx)/len;
        float cos = (dy-fy)/len;
        float i;
        for(i=0.0; i<len; i+=1)
        {
                setpixel(fx+i*sin, fy+i*cos, c);
      }
        return 0;
}
由于要写花斜线的函数用到了开方,但是目前的内核没有提供数学库,所以就自己从glibc移植了一个sqrtf()函数,故在inc目录下新增math.h文件,内容如下
#ifndef MATH_H
#define MATH_H 1
typedef union
{
  float value;
  unsigned int word;
} ieee_float_shape_type;
/* Get a 32 bit int from a float.  */
#define GET_FLOAT_WORD(i,d)                                     /
do {                                                            /
  ieee_float_shape_type gf_u;                                   /
  gf_u.value = (d);                                             /
  (i) = gf_u.word;                                              /
} while (0)
/* Set a float from a 32 bit int.  */
#define SET_FLOAT_WORD(d,i)                                     /
do {                                                            /
  ieee_float_shape_type sf_u;                                   /
  sf_u.word = (i);                                              /
  (d) = sf_u.value;                                             /
} while (0)
float sqrtf(float x);
#endif
在lib目录下新增math.c文件,内容如下:
#include <inc/math.h>
float sqrtf(float x)
{
        static  const float one= 1.0, tiny=1.0e-30;
                float z;
        int sign = (int)0x80000000;
        int ix,s,q,m,t,i;
        unsigned int r;
        GET_FLOAT_WORD(ix,x);
    /* take care of Inf and NaN */
        if((ix&0x7f800000)==0x7f800000) {
            return x*x+x;               /* sqrt(NaN)=NaN, sqrt(+inf)=+inf
                                           sqrt(-inf)=sNaN */
        }
    /* take care of zero */
        if(ix<=0) {
            if((ix&(~sign))==0) return x;/* sqrt(+-0) = +-0 */
            else if(ix<0)
                return (x-x)/(x-x);             /* sqrt(-ve) = sNaN */
        }
    /* normalize x */
        m = (ix>>23);
        if(m==0) {                              /* subnormal x */
            for(i=0;(ix&0x00800000)==0;i++) ix<<=1;
            m -= i-1;
        }
        m -= 127;       /* unbias exponent */
        ix = (ix&0x007fffff)|0x00800000;
        if(m&1) /* odd m, double x to make it even */
            ix += ix;
        m >>= 1;        /* m = [m/2] */

    /* generate sqrt(x) bit by bit */
        ix += ix;
        q = s = 0;              /* q = sqrt(x) */
        r = 0x01000000;         /* r = moving bit from right to left */
        while(r!=0) {
            t = s+r;
            if(t<=ix) {
                s    = t+r;
                ix  -= t;
                q   += r;
            }
            ix += ix;
            r>>=1;
        }

    /* use floating add to find out rounding direction */
        if(ix!=0) {
            z = one-tiny; /* trigger inexact flag */
            if (z>=one) {
                z = one+tiny;
                if (z>one)
                    q += 2;
                else
                    q += (q&1);
            }
        }
        ix = (q>>1)+0x3f000000;
        ix += (m <<23);
        SET_FLOAT_WORD(z,ix);
        return z;
}
做了以上操作之后,只需要在写个测试用的方法加入到现有的代码文件中就可以了,在kern/monitor.c文件中加入test()函数和一些头文件在如下:
    #include "video.h"
    #include <inc/stdio.h>
    #include <inc/math.h>
    struct VbeInfoBlocks vbe_buf;
    #define INT_MAX 0x7fffffff
    void test(void)
    {
            short x,y,flag,flag1;
            unsigned char i,j;
            int z;
            for(z=0; z<INT_MAX;)
            {
                    for(y=0,j=0,flag1=1; y<vy; z++,y++,j+=flag1, flag1=((j!=0xff)&&(j!=0)?flag1:-flag1))
                    {
                            for(x=0,i=0,flag=1; x<vx;x++,i+=flag,flag=((i!=0xff)&&(i!=0)?flag:-flag))
                            {
                                    setpixel(x, y, (0xff0000&z)|(i)|(j<<8));
                            }
                    }
                    //clear(0xff);
                    //drawline(0,0,100,767,0xff0000);
                    //drawrect(0,0,1024,768,0);
            }
            return;
    }
然后在monitor()函数中加入一句:
test();
即可运行测试函数,运行效果如下,是一个R通道随着时间渐变的图像。

经过两天的鼓捣VESA图形界面,身心疲惫,数学不好连个三角形都填充不了,还有其他的例如圆弧,扇形等API感兴趣的可以自行发挥,欢迎debug和交流。
参考资料:
1、VESA编程——GUI离我们并不遥远 http://matrix7.me/2010/04/vesa%E7%BC%96%E7%A8%8B%E2%80%94%E2%80%94gui%E7%A6%BB%E6%88%91%E4%BB%AC%E5%B9%B6%E4%B8%8D%E9%81%A5%E8%BF%9C/
2、VESA BIOS Extension (VBE) 3.0 http://pdos.csail.mit.edu/6.828/2010/readings/hardware/vbe3.pdf
3、个人博客中的此文: http://blog.csdn.net/davelv/archive/2010/11/04/5988418.aspx
好看!
回复 fleurer:[e10]